Thursday 22 December 2016

Nothing Beats Outdoor Christmas Lights in the Snow

It turns out that one of my very favourite things about the Christmas season are Christmas lights.  And Christmas lights in the snow are even better.


This is the front lawn tree I decorate.  It looks good normally, but with snow, it looks like a Christmas card.


How about this arty little number?  I had such fun taking these pictures.


When I look back at the Christmas activities I drag my family too, about a third of them involve outdoor Christmas lights.

I've already raved about the Lighted Truck Parade.  Then there was the Van Dusen Botanical Gardens Festival of Lights.


I could put you in a serious coma with all the glorious pictures I have of the Van Dusen Lights.


Okay, last one...


And if that didn't fulfill your outdoor Christmas light needs, I dragged the family to a new light exhibit called Enchant
.


No idea who the woman is in the forefront of this picture.


This was some serious illumination.


And we still haven't piled into the car, picked up some KFC, blared Christmas music and driven around town checking out all the spectacularly lit homes in town.  But we've still got some time, because if there's one thing this family needs its more outdoor Christmas light exposure.

Monday 5 December 2016

Thank God for Marnie's Craft Studio

I lead a Beaver Scout Colony.  And when I need a craft for said Beavers, one of my 'ace in the holes' is Marnie.  This year I came to her with the idea that I would get the kids to make a Christmas card for a loved one of their choice.  We'd focus on the message and then they'd get 20 minutes to decorate it.

The prep this involved was enormous.


For 2 hours we cut out disks and snowflakes, and more snowflakes, and Marnie used her magic machines to create "Merry Christmas" and character cut-outs.


I get impatient with this level of detail.  But Marnie talked me down off the ledge.  And showed me how to use these fabulous snowflake and circle punches while calmly running off die cut cut outs.


It was a master class in scrap-booking.   Anything I needed, Marnie had it in a drawer, on a shelf, or on a counter. 


I came equipped with paper and she turned it into creative choices I had to pull the beavers away from. They could have decorated a thousand cards. It was magic.  And every kid's card, no matter how enthusiastic they were with the glue, or adding details, had a unified feel, which made them work.


This was my son's finished card to his brother. Worth every minute with the snowflake punch.  Marnie you are truly the best!

Lights! And Trucks!

This weekend was our Christmas kickoff and we headed over to Victoria to watch the Island Equipment Owners Association Christmas Truck Convoy.


Otherwise known as the Truck Light Parade.  This is one of my FAVOURITE activities of the season. I originally started going because I had a little guy who loved trucks.  Now, I go because this is one of the most fabulous Christmas celebrations ever.


These people covered their trucks in Christmas lights. Completely covered.  I can't even imagine the effort this takes.  It's such a magnificent sight to behold.  Remember the goose bumps you used to get watching that Coke commercial with all the decorated trucks?


Well this is even better.  They are right up close, rumbling by, and the lights are so bright.


A truck convoy is pretty cool on it's own.  Now watch it at night; when each truck is coated in Christmas lights and you'll have enough energy and inspiration to enjoy every single crazy moment of the Christmas season.


Thank you Island Equipment Owners Association for a wonderful experience.  You guys did an outstanding job and it was so much fun to watch.

Monday 28 November 2016

Ginger and Molasses

November chewed us up and spit us out.  It has been a rough month.  However, the giant silver lining is we made it through and have come out the other side just in time to focus on CHRISTMAS!!!!!


And one of the first things Marnie and I did was to make ginger chewy cookies and gingerbread cookies.

It started with Marnie hauling lots of her cool baking equipment to my house.


 And then we got down to the business of baking.


 Marnie had to soften the butter because I forgot to leave it out.


We got to bake with molasses which made the batter lovely and dark.


 The batter smelled fantastic and when we baked the cookies the whole house smelled like Christmas.


We used two recipes for this baking session.  The first one was a Good Housekeeping recipe I've had for ages and it worked really well.  These cookies are delicious!


Seriously delicious.  I was fooling around with some icing sugar and a template but I could never get the star centered.  Baker and decorator I am not.

The next recipe was Pioneer Woman's gingerbread.  This dough was easy to make, rolled out like a dream and it was easy to create uniform cookies with it.


 The only flaw, and it was a tragic one, was they did not taste good.  I know, PW never lets me down! Unfortunately, I've noticed that some of her cookie recipes are not as good as I would hope.  This could have easily been baker error, but I had Marnie with me and her attention to detail around this kind of thing is spot on.  We ended up making a second batch of the ginger chews, adding more flour and rolling them out.  It sort of worked, this recipe poofs up and so our snowflakes looked like flowers because all the edges became rounded.  However, the most important detail was that they tasted really good.  And the kids sure loved decorating them.


Ta Da! The first gingerbread of the season!

Better Homes and Gardens Giant Ginger Cookies

Ingredients
4-1/2 cups all purpose flour
4 teaspoons ground ginger
2 teaspoons baking soda
1-1/2 teaspoons ground cinnamon
1 teaspoon ground cloves (we used allspice)
1/4 teaspoon salt
1-1/2 cups shortening
2 cups granulated sugar
2 eggs
1/2 cup molasses

1. In a medium mixing bowl stir together flour, ginger, baking soda, cinnamon, cloves, and salt; set aside.

2. In a large mixing bowl beat shortening with an electric mixer on low speed for 30 seconds to soften.  Gradually add 2 cups granulated sugar.  Beat until combined, scraping sides of bowl occasionally.  Beat in eggs and molasses.  Beat in as much of the flour mixture as you can with the mixer.  Using a wooden spoon, stir in any remaining flour mixture.

3.  Shape dough into 2-inch balls using 1/4 cup dough.  Roll balls in the 3/4 cup coarse or granulated sugar. (We didn't do this - we used powdered sugar after they baked)  Place about 2-1/2 inches apart on an ungreased cookie sheet.

4.  Bake in a 350 degree F oven for 12 to 14 minutes or until cookies are lightly brown and puffed.

These cookies can be frozen for up to 3 months according to BHG. I have not tested this out.


Wednesday 26 October 2016

My Latest Feel Good Obsession

The other day I had to get my winter tires put on and it takes about 2 hours.  When I have to kill time, I tend to call Marnie and if she's free we hang out together, because it's really easy to kill an entire day, never mind two hours, with Marn. Plus she's willing to pick me up from the garage and take me back to her place.

I hunkered down on her couch and started surfing Netflix.  My tastes run to rainbows and unicorns, Marnie is more serial killers and rehab shows.  But we both like - well I tolerate and Marnie loves  - British comedy.

As I was mowing down on cheesy puffs (another great Marnie find);


Marn turned on this British sitcom with great enthusiasm. I was skeptical :


Holy crow I laughed.  I laughed so hard I couldn't breath. Brendan O'Carroll (Mrs. Agnes Brown) is a genius. This show is brilliant! And the Christmas specials, they are so PERFECT!  I haven't seen them all yet but so far my favourite is Mammy's Ass.  Just thinking about some of the scenes in the these shows are instant mood lifters - guaranteed to keep a smile on your face even when you get back to the garage and find out beside the tire change you also needed a wheel alignment and a new stabilizer bar.

I cannot recommend Mrs. Brown's Boys enough! And in cosmic agreement Costco Canada is selling the DVD boxed set.  You can also watch it on Netflix and BBC Canada.  I'm trying not to binge because fresh Agnes Brown is the funniest.

I will leave you with  this clip:


You're welcome.


Monday 17 October 2016

A Really Good Thanksgiving Dinner Menu

Thanksgiving has come and gone; weeks of planning, days of cooking, a weekend of entertaining house guests and constant eating leaves testimony to a truly wonderful culinary experience.  It took me just over a week, with lots of help from my family, to get the house back in order.  And now I will share with you what Marnie and I found really worked for Thanksgiving Dinner.

Obviously, it started with the Turkey. Marnie adored the brined turkey, Me, I felt it was a lot of work for not a huge return.

Cooks Illustrated Roasted Brined Turkey
The Brining recipe we used was from Cook's Illustrated called "Roasted Brined Turkey". Not sure if you will need a membership to see this page or not. Here is the link.  If you have a magazine subscription, the original published date was November 2004.

In future, I'd get a frozen butterball.  They are essentially pre-brined.  To Marnie this is sacrilege but I didn't notice a huge difference.

Now on to the sides, my FAVOURITE part of the meal.


We rocked the house with the side dishes we chose. Sadly most of them came from Cook's Illustrated and without a membership you might not be able to see the full recipe online.  I'm fairly certain you can find them in their cookbook collection at the library.

First off, roasted green beans. Simple, classic.

Cook's Illustrated Roasted Green Beans
Then cauliflower in a cheddar sauce with bacon.

Cooks Country Creamy Cauliflower Casserole with Bacon and Cheddar
My cheddar sauce turned out to be a bit runny, because they way I cooked the cauliflower had it retaining a lot of water.  Next time I'd roast the cauliflower - or let it sit out to dry for much longer. However, it tasted so good, no one cared about the sauce thickness except me.

We also served roasted brussel sprouts (brussels sprouts?  Spelling these suckers is very confusing) with bacon, red onion and squash.  Oh, it was so good. So, so good.  And I don't like brussel sprouts.

Cook's Country Roasted Brussels Sprouts with Bacon and Onion
The inspiration for the side dish was this Cook's Illustrated recipe plus Pioneer Woman's thanksgiving throw-down with Bobby Flay's recipe.

The Pioneer Woman's Beautiful Brussels Sprouts

I totally bastardized them.  I kept Cook's Illustrated's way of roasting the actual sprouts but I added squash which I microwaved and then pan fried to a golden brown.  Then I tossed everything together.  It was amazing!  I did end up hunting down the pomegranate sauce.  But that is a very unique taste,  And I did not have the courage to use it.  Not sure how it would have paired with the bacon.

We also had stuffing.  My stuffing recipe inspiration comes from my Mum who adds cream cheese and sausage and my mother in law who showed me the basics.  Cook's Illustrated also taught me why it's better not to stuff the bird. They also provided the brilliant advice of baking your stuffing with fried turkey wings on top.  Fantastic!  I admire the chefs behind Cook's Illustrated so much.  Here's a link to their recipe.  There's no picture because I didn't follow one recipe, and I forgot to take a picture of my own.

And then the 
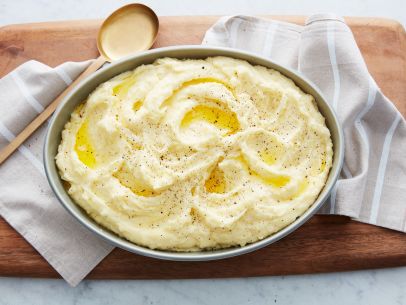
pièce de résistance number 1 - Mashed Potatoes.  Hands down, in my humble opinion the best mashed potato recipe, and the best advice on how to mash them recipe;  goes to Ree Drummond, Pioneer Woman.

The Pioneer Woman's Delicious Creamy Mashed Potatoes

Did I mention these are the very best.  I learned that once you've boiled the potatoes you should mash them without adding anything else to let out all the steam they contain.  This was a game changer for me. And it made all the difference.  Ms. Drummond also suggests you take the casserole out of the fridge and leave it out for a couple of hours to bring it to room temperature before you heat it up in the oven. I totally forgot to do this.  So I ended up microwaving it for a few minutes and then sticking it in the oven.  Worked like a charm.


pièce de résistance number 2 was the gravy.  Again, I go to the gods of cooking, Cook's Illustrated for their phenomenal gravy recipe aptly titled Best Turkey Gravy.

Cook's Illustrated Best Turkey Gravy
I am not the quintessential homemaker. While relatively organized, I tend to fly by the seat of my pants often.  But I had a brilliant homemaker moment when making this gravy.  I was able to use homemade turkey stock that I'd frozen, made from last Thanksgiving's turkey.  That was a full circle instance that made me smile.  I don't really like turkey stock soup.  I made the stock on a whim and then froze it because I didn't really know what to do with it.  Now, I've got a new Thanksgiving tradition.  And how I love a good tradition.  Cook's Illustrated has a wicked turkey stock recipe.  (Of course.)

And finally pièce de résistance number 3:  DESSERT! I served The Pioneer Woman's Pumpkin Gingersnap Cheesecake with Salted Caramel Sauce.  I'd like a moment of silence to honour how truly divine this recipe is...


Ree Drummond's Pumpkin Gingersnap Cheesecake

Making a cheesecake intimidates the heck out of me.  This was a cake walk. :)  I looked like such a superstar and it was so easy.  I am extremely grateful Ree Drummond chose to share this.  You too can look like a superstar with this recipe.  It is so good there are no words.   Interestingly, there's actually two ways to make this recipe.  I followed the Food Network recipe.  But Ree posted a slightly different version on her blog. As far as I can tell one has slightly more cream cheese than the other and the caramel sauce is worked in differently.

So there you have it folks, Thanksgiving Dinner from start to finish brought to you by my culinary heroes Cook's Illustrated and The Pioneer Woman.  Tested by Marnie and myself.  I can't wait for next year!!!

Tuesday 4 October 2016

The Great Turkey Fetch

Thanksgiving is next week and Marn and I need turkeys.  We've been spending the last week talking about menu ideas; I've been drooling over the new PW fall line; we are on the lookout for zip lock bags big enough to brine large Turkeys; and getting inspired by thanksgiving specials on the food network.  And that's just the fun stuff.

So yesterday we gathered our lists, well I gathered my lists, Marnie has it all up in her head.  I have no idea how she pulls that off, but pull it off she does, every dang time.  And we grabbed our cooler bags and headed across the boarder to buy cheap Turkey.


Here's the thing, I had no idea how cheap.  It turns out Costco in Bellingham is offering fresh turkeys for 99 cents a pound.  Fresh...99 cents... It was AWESOME! (That's $1.30 Canadian, for fresh turkey. And free shopping trip with Marn, fabulous!)

So with turkeys in hand we perused everything else the american shopping experience had to offer.


Eight of those milk monstrosities later, plus enough butter, cheese and bacon to make Thanksgiving a truly marvelous event, we headed to the checkout.  Bellingham Costco can be a very dangerous place.


P.S. I had to blur some of the cart's contents because of little prying eyes.  There may or may not be an impulse Christmas buy in that cart.

Sunday 2 October 2016

Astronomical and Meteorological Seasons

I'm coming down from the seasonal transition highs and lows.  Summer ended and I cried, but school started which always makes me feel optimistic and excited.  School wasn't the only thing that started.  All the electives my children and I participate in came rushing at me like a freight train.  And along with those activities came a boat load of stress.


When summer turns into fall, I'm sad and excited, and usually slightly overwhelmed at the same time.  When fall becomes winter it's a giant race to see how organized I can be.  When Christmas ends and the new year starts, I'm blue for about a month and when winter ends and spring begins it's a crazy, crazy, energetic and optimistic time. There's something about transitioning from one season to another.


And this year I was really excited to learn that there is a different timing of the seasons that works much better with my frame of mind.  For all of my life, I've marked the seasons astronomically but always felt like they missed the mark.  Fall begin with the Fall Equinox, Winter with the Winter Solstice.  This  year, however I learned about meteorological seasons.  These bad boys start and end earlier then their astrological counterpoints.  And they make much more sense to me.  Meteorologists group the twelve calendar months into four 3-month periods based on similar temperatures.  And each season starts on the first of the month. So fall starts on September 1st and ends on November 30th; instead of starting on September 22 and ending on December 22nd. Which means winter can start on December 1st instead of December 22nd.
I can't tell you how happy this makes me.  Why?  Because!

No seriously, it's the little things.  I want my seasons to start at the beginning of the month.  I want them to start when the weather turns.  I love that Thanksgiving and Easter will now fall in  the middle of the season.  This just makes much more sense to my way of thinking; a season defined by temperature rather than daylight.  Please don't get me wrong. I think the equinoxes and solstices are something very special.  And I honour each one.  But I am so happy that winter will start for me legitimately on Dec 1 instead of Dec 22nd.   And end on March 1st instead of March 22.  And now  I  have the science to back it up.

Now if only I could get someone to recognize that summer begins when school ends and that thinking about Christmas once your fall routine is underway does not require an apology.

I know, I know, I totally need to get out more. But I'm too busy starting to plan my Christmas.

Friday 30 September 2016

Processing Plums

I've been inundated with fall fruit.  Sadly my family are not fruit eaters.  And fall fruits are especially challenging.  No one in my household will voluntarily nosh down on  a big bowl of plums or pears. But I'm cautiously optimistic about apples. 

Today's focus is on plums. 


 I find a plum here and there delicious. But it isn't one of my go to fruits and it has a very distinctive taste.  Which means one or two plums a season works for me.  My neighbors are very successful urban farmers and they are also very generous.  So now I'm trying to figure out what to do with a large bushel of plums.  Whipping up a batch of plum apple crumble is out of the question because I would be the only one eating it.  And when I looked up plum jelly it involved straining it through a cheese cloth. So that's out. Also this would involve canning.  And while I'm not adverse to canning, I don't really need 16 jars of plum jelly in my cupboard.  I suspect my neighbors wouldn't be thrilled with plum jelly either.  Especially the ones who are giving me plums because they've got so many. Which brings me to my plum processing adventure.  I decided to make plum sauce.  The kind you eat with egg rolls. 

So the first thing I needed to do was process these beauties.


This was kind of fun.  And gross.  I blanched the plums so the skins would peal easily.  And then I harangued my son into helping me peel.  Plums are squishy, sticky, and soft. And the texture is not fun to roll around in your hand while you pull the skin off.  The really cool thing is how much natural purple die is in their skins.  I thought long and hard about keeping the skins for some kind of tie-die project I could do with my beaver scouts.  And then when I was scrubbing purple plum die off everything in my kitchen I decided maybe next year.

Then I pitted them, cut them up, and boiled them.


Once they reduced to a mushy consistency I started adding plum sauce ingredients.


But not before I took some of the processed plums and put them into a container that I've got sitting in the freezer.  Because this recipe was inspired by four different recipes I found on the internet.  And I wasn't confident it would work out.  So I wanted some reserve plum mush to play with again.

Here's what I added.


Sadly, this photo is not clear.  So I'll spell it out: reduced salt soy sauce, garlic, ginger, and some sweet chili sauce. Oh, and red onions. A third of a cup of diced red onions to be exact.


 It worked out okay.  It was very thick.  Next time I'm going to strain it.  Also it had a bitter zing to it which was delicious with pork dumplings.  In fact the whole thing rocked with the pork dumplings.  But it didn't pair as well with egg rolls.  It wasn't bad, but it wasn't the commercial yummy that comes in a little orange packet when we order Chinese.


My attempt at plum sauce take 1:

2 cups processed plums
1 tsp minced garlic
1 tsp minced ginger
1/3 cup red onions
1/4 cup reduced sodium soy sauce
4 dashes of sweet chili sauce
a sprinkle of red chili flakes

Bring to a boil and blend with an immersion blender.
Let cool.  Serve.

Turns out this stuff freezes very well.